Memories... Like Mom Made!

Memories... Like Mom Made!
Out of dark moments, flowers grow.

Tuesday, November 16, 2010

Shortbread: Quick and Tasty!!!


So most of you know that I have a full time job on top of my "full time job" as a wife and mother... Which is why new recipes are few and far between...

Well every now and then my poor baby boy is sick and I am forced to stay home with him and spoil him rotten.

Today was one of those days. I will spare you the gruesome details, but long story short, he was hacking and coughing all night and day long! It was nice to be able to give him love and nurse him back to health - one of the most wonderful things about motherhood is that Mama always makes you feel better!!! :)

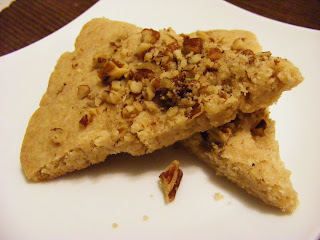
Well anyway, with all of my extra time at home I became extremely motivated to do, well, everything!! I cleaned out my cabinets, hung up a mountain of clothes that had been mocking me, washed about 38,000 loads of laundry (exaggeration? Guess we will never know...) I also broke out my apron and floured my hands and got down to work in the kitchen. I whipped up something I have been craving a lot lately! Shortbread cookies!!!

My favorite thing about Shortbread in general is that it is SO versatile and can be made to suit anyone's tastes! If you read my blog much, you know that I LOVE any opportunity to alter recipes and make them unique... personalization is key to any good cook!

So how easy is this recipe you ask? Well let me ask you this: does 3 ingredients sound easy enough for you?

Yes?

I thought so...

So the basic recipe is this:

1/4 c packed brown sugar
1 1/4 c sifted all purpose flour

sift together then cut in
1/2 c REAL butter (I use salted because a little extra salt is always welcome here....)

Work into a nice dough and roll into a circle on parchment paper. Cut into 8 wedges but do not separate on the sheet. Place parchment on a cookie sheet and bake in a preheated 325 degree oven for 15-20 minutes or until cookie is firm in the middle.

Now for mine I simple sprinkled 1 teaspoon cinnamon into the flour and sprinkled 1 teaspoon pure vanilla onto the dough as I was working in the butter. Then I rolled into the circle, cut my wedges, then I sprinkled finely chopped pecans on top and lightly pressed them into the dough.

After the wedges bake you will want to recut them while still warm with a pizza cutter or knife... You can also sprinkle a little bit of white sugar on top for a nice texture and finish... That is how the shortbread I grew up with always was! But it was cut into bars and not wedges, and they made it a lot thicker than I make mine... but other than that, the basic recipe was the same!

Some suggestions:

Fold nuts into the dough

Fold chocolate or flavored chips into the dough

Cut into different sized rounds and brush with melted butter after baking and sprinkle with colored sugar

Add lemon extract and poppy seeds to the dough

Add chopped dried cranberries to the dough (ooh and some white chocolate chips!!!)


*If you cut the cookies into shapes you will want to bake them for 10-15 minutes instead of 15-20.

Start to finish these cookies take less than 40 minutes!

Wednesday, October 6, 2010

Chocolate Pudding: The Ultimate Comfort Food

Tomorrow I will officially be 9 weeks pregnant... This means I will be 4 weeks away from being out of the first trimester... Most people say that your morning sickness is supposed to stop around 14 weeks, which means that typically I would have about 5 weeks of morning sickness left and then I should get some relief....

HA!!!

Well, if I were typical, that may be true... But I have never been, and probably never will be, "typical"...

So my hopes aren't high for the end of "morning sickness" (yet another thing that makes me laugh, because morning doesn't have much to do with this sickness... I think this baby has a mind of his/her own...) to come anytime soon. Instead I will continue to bring you recipes that have been friendly to my rather easily up-settable pregnant palette. Try saying that one ten times fast: easily up-settable pregnant palette...

Well anyway, today I attempted an impromptu chocolate pudding. I call it impromptu because I didn't plan it out very well... In fact, I started throwing bits of randomness into it as I went, and don't you know that is usually how I end up with my best products...

Well anyway, this is how I did it (well, sort of... I will clean up the craziness for you and just give you a recipe that makes sense...)

Homemade Chocolate Pudding

1/2 cup packed brown sugar (golden brown is what I used)
1/4 cup plus 1 Tbs unsweetened cocoa powder (this is roughly how much I used... I started with 1/4 cup and the sprinkled in some more for good measure... If you want yours to be more milk chocolatey, then only use 3 Tbs, or 1/4 cup)
2 Tbs cornstarch (I started with 2 Tbs and sprinkled a little more. If you want to use this for a pudding pie, put in 3 to 4 Tbs)
Dash salt

Sift these ingredients together in a sauce pan making sure to remove all lumps. By the time I got done the powder I ended up with resembled the instant stuff you buy in a box.. But of course this will be way better....

Turn the burner on medium heat and add 2 3/4 cup milk. Whisk like crazy (don't get discouraged... at first it will look all lumpy and then all of a sudden you will have a magical moment when it all mixes into a creamy chocolate milk looking consistency.)

I sprinkled a little bit of cinnamon into the pot about halfway through, just for a nice touch... Feel free to do it if you want to.

I also noticed halfway through that it was a lot less chocolate looking than I wanted it, so I tossed in a handful of chocolate chips and stirred those like crazy until they melted too. This is also optional.

Continue to let simmer until it starts to thicken. This will also be a magical moment, so watch it closely or it will thicken into a big nasty blob (that almost happened to me, but I caught it in time!) Once it starts to boil, stir it down and remove from heat. It should be thick enough to cling to the back of a spoon (or cling to your whisk), but not as thick as cooled pudding. Remember, it will set up as it cools.

After removing from heat, stir in 2 Tbs margarine and some vanilla. Stir thoroughly, let cool a bit, then pour into serving cups (or tupperware, if you plan on saving it for later like me!).

Enjoy!!!

Monday, September 27, 2010

Cheese Sauce, and Many Ways to Use it!!!

Ok so in case you didn't know... We recently found out that I am pregnant!!!!!!

Well so far this baby has been very... hmmm... let's just say picky. Very, very picky.... And by picky I mean that if this baby doesn't get exactly what he or she wants, mama gets very VERY sick... Needless to say, this is a hard task to accomplish, so I am sick a lot...

But there has been one thing that I have been craving nonstop, and that I have managed to keep down about 50% of the time (that is actually a really big deal right now, believe it or not!).

Cheese sauce... Yes, you read right: cheese sauce.... on EVERYTHING!!!!

The first time I made the sauce it was to make a homemade au gratin potatoes for my husband's birthday dinner... It was so tasty and I liked it so much I made it again a few nights later and steamed some broccoli and some rice and then mixed it all together to make homemade cheesy broccoli rice (I used to love the stuff in a bag, but that is sooooo not good for you... so this is a good alternative).

Then I made pasta the next night, steamed some more broccoli, and cut up some cooked chicken into chunks and tossed it all in cheese sauce...

Oh and if those three ideas weren't enough, I made another recipe involving crescent roll dough stuffed with chicken and cheese, topped with a cheese sauce (to which I added a can of cream of chicken and mushroom soup) then baked in the oven... super yum...

Okay so anyway... Cheese sauce...

Start with 1/4 c butter and a few tablespoons flour. Melt the butter in a saucepan over medium heat, then stir in the flour and mix well. Add about a cup and a half of milk, stirring well. After the mixture bubbles, add 1 cup of cheese into the pot and stir well. Once the sauce slightly bubbles and thickens it is finished...

The type of cheese can be changed for the recipe... I have used sharp cheddar, mild cheddar, and a four cheese mixture... All of them were good, though the sharp cheddar is my personal favorite...

A few ideas for using it:

Fondue!!! Cube a loaf of french bread and dip in the cheese sauce (you can use a fancier cheese for this, or just plain old cheddar).

Broccoli Chicken Cheesy Mac: Cook pasta according to package. Meanwhile make the cheese sauce, when adding the cheese also add 1/4 teaspoon nutmeg or chili powder. Steam broccoli florets and cut cooked chicken into cubes. Toss with pasta and sauce and serve. If you use already cooked chicken this recipe takes 15 minutes to make, start to finish!

Cheddar Broccoli Rice: Steam 1-2 cups of rice. Steam 1 cup of broccoli. Make cheese sauce and toss with rice and broccoli. This recipe only takes about 15 minutes to make if you use minute rice.

Cheddar Broccoli Rice Bake: Make cheddar broccoli rice. Layer a casserole dish with thinly sliced chicken tenders. Top with cheddar broccoli rice and bake in a preheated 350 degree oven for 25 minutes, then top with cheese (and French Fried Onions if you want some fun texture!!!) and bake for 5-10 minutes or until chicken is cooked through.

Au Gratin Potatoes: Thinly slice four to six large potatoes. Layer potatoes in a casserole dish, pouring half of the sauce over the first layer, followed by another layer of potatoes, and topped with the rest of the sauce and grated cheese. Cover with foil and bake at 300 degrees for an hour and a half.

Enjoy!!!

Friday, September 3, 2010

Steak and Bean Quesadillas with Tomatillos!!!

So tonight's post doesn't have any pictures, but I think I am doing good to post anything at all with the rate I've been at lately...

We had these last night and a friend asked for the recipe, so I figured I might as well share it... These were delicious and, like most of my recipes, are VERY easily customized or adapted... Have at it! And like always, if you make them yourself, I would love to know any adjustments you make, or ideas you have!


You need:

1/2 lb tomatillos, husked and washed (the husks are the little green wrapper looking thing... gently peel it off and then scrub the sticky residue off of the tomatillo)
generous spoonful of minced garlic
1/2 c shredded carrot
2 tsp cumin
olive oil

2-3 london broil steaks (I don't know the exact term for them... but they are the big flat thin cuts of meat... great for salads and whatnot... if you have trouble finding them, just ask the meat guy at your grocery store for help!)

1 15 oz can black beans (drained and rinsed)
1 cup frozen corn (rinsed and drained)

cilantro

a pack of tortillas... I used the 8 inch kind.. but the huge burrito kind would have been good for folding over... i did mine sandwich style with two tortillas.

1 - 2 cups monterey jack cheese, shredded

salsa (homemade if you can help it ;) of course )


shred the carrot and chop the tomatillos... saute garlic in a good glug of oil over medium high heat until fragrant... add the veggies and the cumin and stir well. cook until the veggies are tender, taking care to not burn the garlic.

add the beans and corn and heat until heated through, then transfer to a bowl, cover with foil, and set aside.

while the veggies are cooking, salt and pepper the steaks and set on a broiler pan... broil on high for about 2 minutes on each side or until brown but not over cooked.. i like mine to be the tiniest bit of pink in the middle, but that is hard to achieve with a cut this thin, so cook it to your preference. let set for a few minutes, then slice at an angle into very thin strips and set aside.

wipe out the pan you cooked the filling in and heat over medium high heat. spray a tortilla with cooking spray and lay spray side down on the hot pan... heat until browned and then spray the up side with cooking spray and flip over. top with a handful of cheese, some steak strips, a big scoop of the bean mixture, some cilantro if you have it, and some salsa. top with another tortilla (or fold over if you are using the huge ones), and spray the upside with cooking spray. once the bottom tortilla is browned, carefully flip the quesadilla and brown the other side...

remove to a cookie sheet and place in the oven to keep warm... i ended up wrapping ours up in foil first and then passed the foil wrapped quesadillas out to each individual.. it worked out well... serve cut into triangles and with salsa and lime (if you want to be fancy)...

these were delicious! I hope you enjoy them!

Saturday, August 7, 2010

Easy Peasy Meatball Subs


This is the easiest and yummiest crock pot meal EVER! In fact, it is too easy... But it is so delicious that I am posting it anyway.

Okay, here is what you do...

Grab a bag of frozen meatballs (or you can make them from scratch.. whatever), and a big can of sauce (or you can make it from scratch.... :P) and throw it in your crock pot. Mix it around a bit, and add some seasonings (oregano, basil, whatever makes you smile). Turn it on LOW for 4-5 hours, NO LONGER, because otherwise you will have meat sauce and not meat balls!!!!

A few minutes prior to dinner time, get some big hoagie buns and open them, spray them with cooking spray (I like to cheat this way), or spread them with butter, then toast in a broiler for a minute or two or until nice and toasted.

Top with some of the meatball mixture, then top with lots of yummy mozzarella, then pop back under the broiler to melt the cheese. Top with some fresh basil and enjoy!! These are SO yummy and guys will go back from seconds and even thirds!


Gingerbread Muffins with Orange Cream Cheese Frosting


Let me just sigh a contented sigh of yumminess...

*Sigh*

These things are pure heaven: seriously.

I had found a recipe vaguely resembling gingerbread muffins... I played with it until I found something that took me back to Christmastime in my childhood and knew I had done it right...

Then I wanted to dress the little guys up in something delicious and I had a bunch of oranges laying around, so I decided to give them some life and came up with a delicious cream cheese frosting with a hint of orange flavor.

It was a beautiful marriage...

So anyways, let me explain something really quick... The fact that I am about to share this particular recipe is a VERY BIG DEAL... This is one of those recipes that whenever I make these muffins (which I often pass off as cupcakes) and take somewhere, everyone wants to know my secret... to which I just smile and say "If I told you, it wouldn't be a secret anymore, now would it?"

Well, guess the secret is out. Here you go! Enjoy!

Most Amazing Incredible Super Delicious Gingerbread Muffins:

1/2 c water
1/4 c butter (go on and use the good stuff, you know you want to)
1 egg
1/4 c molasses
1/4 c sugar
1 tsp vanilla
1 c all purpose flour, sifted (duh)
1 tsp cinnamon
1 tsp ginger (gasp! surprise!)
1 tsp (or a little more) pumpkin pie spice
1 tsp baking soda
1/4 tsp salt

Preheat your oven to 350... also, enlist help of little person or unsuspecting husband (boyfriend, friend, or whoever) to line muffin tins with the little baking cup things.. Just a note, I prefer to do mini muffins... they turn out better and are such a satisfying little treat.

Put the butter and water into a microwave safe bowl and microwave until melted. I usually do about 30 seconds at a time until it is bubbling.

Meanwhile, whisk the egg in a bowl until well beaten. Add sugar and molasses and whisk well. Add the water and butter mixture and vanilla and stir well again. Then sift the remaining ingredients on top of the liquid mixture. Slowly stir to combine the wet into the dry without over stirring.

Pour into prepared muffin cups and bake for about 10 minutes. (20 for regular sized muffins).


Orange Cream Cheese Frosting

1 package cream cheese, softened
1/4 c butter, softened
1 tablespoon of fresh squeezed orange juice
1 cup powdered sugar (or more depending on consistency, I think I ended up with about 2 cups or a little less)
1 tsp vanilla
lots of orange zest (as much or as little as you want, but the more the merrier I always say)


Okay, let me just point out that when I say "softened" I MEAN softened!!! Make sure you have these suckers out for enough time to be workable, but not like, melted or anything... If you forget to set them out, unwrap the cream cheese, set it on the plate, and microwave for like, 8 seconds. That should do it. Same thing with the butter but only for 5 seconds.

Cream the butter and cream cheese until creamy and whippy (is that a word?). Add the vanilla and orange juice and beat until blended. Sift in the powdered sugar and beat the crud out of it.. Then add in your zest and mix well.

I usually spoon the frosting into a sandwich baggy and use it like a piping bag... Just a tip, stick your baggy in a tall glass and fold the edges over it like a garbage bag in the can, then dump your frosting in it... much easier and less messy!!!

Enjoy!

Stuffed Anaheim Peppers


Okay so to be quite honest, I actually made these stuffed Anaheim peppers back in May and June, but never put up the post... I have been slacking, yes I know, and for that I apologize. But let me make it up to you: just trust me... make these peppers and then you will sit back and say "okay Virginia, I forgive you... This was worth the wait."

So what, you may ask, IS an Anaheim pepper? This link will fill you in, as well as give you some tips about buying and what to look for, as well as a picture.

Okay, now that you are up to speed, let me explain the thought process on this recipe... I was making enchiladas with homemade tomatillo sauce (verde sauce) and I wanted something to accompany it. So my Mommy, who is AMAZING, is ALWAYS talking about these delicious peppers she likes to make. She stuffs them with pretty much just cream cheese and then broils them. I decided to take it a step further and add some grated cheddar cheese, cilantro, garlic (because, well let's just face it, garlic rocks), a few bread crumbs (totally optional), and then to top the whole thing off, I wrapped those suckers up in delicious thickly sliced bacon.... Then I broiled them until both sides were nicely browned and the bacon cooked... Then we dug in... and THEN my husband said "hey honey, can you run to Wal-Mart?" I said "Why? What do you need?"

his reply???


"More Anaheim peppers! These things rock!!"

So there you have it: easy enough to do, a total man pleaser, and a great compliment to any southwest, tex mex, or mexican meal... (or really anything honestly).

Here is how you do it:

4 Anaheim peppers, washed
1 block cream cheese
1 cup grated sharp cheddar cheese
1 bunch fresh cilantro washed and chopped
1 clove minced garlic
1/4 c bread crumbs (I used the seasoned kind... didn't really go with the "mexican" theme, but tasted awesome!)

bacon. lots and lots of bacon...
oh and tooth picks. you need some of those too. And if you have a broiler pan, I suggest you dig it out, it will come in handy.

Okay so first you set out your cream cheese and let it soften up a bit, just so it makes things easier.

Then you need to seed and prep your peppers. Remember, you are going to be stuffing these and then roasting them, so you don't want to go lopping the tops off. Instead, make a slit all the way down the pepper, then cut halfway through the top part of the pepper, without severing it completely. This will allow you enough room to cut out the seeds and give it a good washing (which helps the stubborn seeds break loose), and stuff it up with your filling.

Once all your peppers are prepped, set them aside and start making your filling... Basically add everything except the peppers and the bacon to a bowl, then mix it up really well and stuff 1/4 of the mixture into each pepper.

Now comes the fun part! Take a tooth pick and stick a slice of bacon to the top of the pepper in a way that covers the seam from the cut. Then wind the piece around the pepper, make sure that all the seams are covered (to prevent the filling from leaking out). You will need a couple of slices per pepper at least... and lots of toothpicks. Don't worry about going overboard with the toothpicks, you will just pull them out once the peppers are done anyway! Better safe then sorry!

Preheat your broiler and line the peppers up on a broiler pan. I like to line my pan with foil so that clean up is a snap... Oh and if you don't have a broiler pan you could just use a foil lined cookie sheet or a foil lined cookie sheet with a cooling rack sat in it...

Broil for about 5 minutes on each side, checking frequently so that they don't burn.

Enjoy your deliciousness!


***Correction: Added March 3, 2011***

My mother contacted me to correct my description of her peppers. She also wrapped them in bacon and put other goodness into the filling. So I guess great minds think alike. I wasn't as different as I thought! Sorry Mommy!!!!


Thursday, July 8, 2010

Sausage and Roasted Red Pepper Rigatoni


Tonight's meal was such a success that I decided to do something that I haven't done and have been needing to do in/for a long time! Post a recipe the night I made it! (heck, post a recipe at all!)

So have you ever seen the commercials for the Bertolli bagged meals? Basically they make you think that Bertolli has captured the perfect way to make an Italian meal and that even attempting to make it from scratch would be hopeless... Way to go Bertolli! (don't get me wrong, I actually have enjoyed a couple of the Bertolli meals on the go or when I didn't have enough food on hand to come up with some kind of dinner, but seriously, cooking pasta and making sauce and stirring it all together isn't exactly a science...) Well my husband and I saw this bagged pasta dinner that had sausage and rigatoni and all sorts of yummy goodness in it... and I won't lie, we bought it and thought it was VERY delicious... but when I had a chance to go to the grocery store, I decided to make myself a little challenge against the big B... I bought a red pepper, a jar of pasta sauce (I would have made it from scratch, but time has been of the essence lately and my homemade sauce takes me all day!), a pound of smoked sausage, and a box of rigatoni... I already had garlic, basil (growing outside!), and parmesan at home, so this was all I needed... I want to say it was under $5 total, and the bagged meals cost about $6...


Before I got started I prepped my pepper (deseeding it and slicing it in half) and lined a cookie sheet with foil. Then I turned my broiler on high and plopped the pepper on the cookie sheet and into the oven for about 20 minutes. (in hindsight, my oven rack was kind of low... if it had been higher it would have taken less time).

Once the peppers are super black, toss them into a plastic baggie and let sit for a while so that the steam will loosen the skin off of the pepper. This whole process can be done in advanced... look here for some other amazing roasted red pepper ideas from the fabulous Emily at Joyful Abode! She also gives an amazing step by step instruction on how to roast red peppers... and also how to seed them! She pretty much rocks!

Ok so start a pot of salted water boiling... Once at a rolling boil, add the rigatoni and set your timer to 11 minutes. Meanwhile, heat some EVOO over medium high heat in a large skillet... Chop up your sausage into 1/2 inch thick (or smaller) slices, then toss into the skillet... Once the sausage is close to being browned, add some minced garlic and give it all a good stir... Continue to brown.


Slice the roasted red pepper into thin slices, then toss into the pan with the sausage. Add the jar of sauce and stir...

Drain the rigatoni and add to the sauce and sausage mixture... Stir well and let bubble for a minute.

I topped ours with fresh grated parmesan cheese and basil leaves from our garden, and served with Pillsbury Savorings (the spinach and cream cheese kind are our favorite!). We would have had a fresh salad too, but we were anxious to dig in and didn't want to waste time making a salad! :)


This is a serious two thumbs up!!!!

Some ways to tailor it to your family:

Leave out the red pepper
Add olives
Add sun dried tomatoes
Add mushroom
Add crumbled hot italian sausage
Use spicy sausage instead of smoked
Add ground beef in the sauce/use meat sauce

I am sure there are tons more variations, but this was fabulous just the way we had it! Oh and Landon approved: see for yourself!!!

Sunday, June 27, 2010

Holy Goodness How Time Flies

So you blink once and realize that an entire month zoomed by... I have a million recipes to post, but not quite enough time to sit down and get it done...

so without taking too much time, this post is my way of saying "bear with me, don't give up on my little blog yet... I will have more for you soon"

Have a great week all!

Wednesday, June 9, 2010

Giveaway: Make Lunch Easier

So the correct grammar for the title would more likely be "make lunch more easily", but we are just going to roll with it...

Okay so I never talk about leftovers: but I have oodles of them... Always... and we always take them for lunch, which is kind of a pain because I usually end up packing like 3 different containers (each) for my husband's lunch, and mine... So when I saw this giveaway I bolted forward and read as quickly as I could about what I had to do to get one... And here I am...

Check out this great giveaway! If you have kids and make their lunch every morning, then you probably have millions of ziploc baggies floating around, or you have some random mismatched tupperware that doesn't always fit in the lunch bag right... So aggravating... This system not only makes lunch packing easier, but it lends itself to endless creativity! Just check out the garden themed lunch she made her son in the giveaway post!

Good luck to you all, though I hope to be the winner myself, of course!!!

Peace!
V

Tuesday, June 8, 2010

Pick Me Up

So sometimes I get in a funk... and I need a pick me up. Well today I am not even in a funk, and a friend said something so nice to me, that I am pretty sure it will work any time I need it to in the future... So I decided to post it so that I can "visit it" any time I need to defunkify....

Virginia- You amaze me almost on a daily basis...and you live halfway across the country! You are always smiling and happy, and that makes those around you happy. You are a wonderful mother and wife and friend. Your cooking...as I've told you... makes my mouth water. I want to live in your house, just to try your food. You're always there for me when I need someone to talk to. You are strong and caring, humble and just a beautiful person. Thank you for being my friend.


Sweet, right? Good friends make the world go round...

Let this be a lesson to tell your friends often how special they are... You never know when something you say may turn their week right around.

Chicken and Okra in Peanut Sauce

I first tried this dish at a potluck for our FRG last year. I was hooked right away. I know there are many variations on this dish that can be found on the internet and whatnot, but I concocted my own variation and was pretty pleased with it.. What is this dish I am describing? Basically it is chicken with okra... like the name suggests... but the sauce is a combination of the juice from tomatoes in the dish and a couple tablespoons of peanut butter... It is a creamy delicious sauce and anyone you serve it to will beg for the recipe!

This is an awesome "meal in one" dish... You get protein, veggies, and great flavor in this dish. Serve over rice and dinner is served!


I have to warn you right now though, I forgot to take pictures of every single step, and I didn't take one of the final product either.. so basically that means I have to remake the whole thing again so I can take more pictures!

Chicken and Okra in Peanut Sauce

1 lb chicken breast, cut into 1 inch cubes
1 1/2 c frozen okra (I added more because I love okra, but you can add less if you are skeptical)
1 onion, chopped finely
minced garlic
1 can diced tomatoes, with juice
1/4-1/2 c peanut butter
salt and pepper

Cook the chicken in olive oil in a large pot. When done, remove to a plate and add another glug olive oil.


Sauté the onion and garlic until onion is translucent. Add the tomatoes and bring to a soft boil.


Add the okra and the chicken. Grind some salt and pepper on top and stir well. Add peanut butter, starting with 1/4 c and increasing to taste. Let simmer until okra is no longer frozen and everything is heated through.

Serve on rice.

This may sound easy and a little strange, but let me reassure you that this will be a hit at your dinner table!!

Thursday, June 3, 2010

Landon's Best Friend

Javi is my wonderful black and white (resembles a Holstein cow...) kitty cat... He is the "original" man in my life and has been around for almost 3 years... He was just a baby when Donovan and I met and that first night when Donovan stayed in my house (snowed in by a blizzard), he slept on the air mattress with him all night long and licked Donovan's head while he slept... (yes, you caught that right: I am a good girl and I banished him to the air mattress...)

After my strangely maternal bond with Javi, and Donovan's just strange bond with him, it was fitting that our son relate to him as well... but we never in a million years dreamed that they would be as close as they are... When Landon was just a newborn Javi would curl up on the couch next to him, under the bassinet, or on the play mat with him. Wherever Landon was, so was Javi... They have been inseparable since Landon was born...

So the point of the story is this...

PICTURES!

Yeah I know, a long story to show some pictures...

Enjoy.


White Bean Spinach Hummus Dip


I am NOT a good name giver... Let me just say that right now... Basically this dip was a DELICIOUS accident.. I had a ton of spinach that I wanted to use, so I decided to "go with it"... I opened the cabinet and found a can of Great Northern Beans and a can of Garbanzo beans... From there, an idea was born.

First, chop an onion finely and throw it in a sauce pan with some olive oil. Throw in a couple minced garlic cloves. Stir until fragrant.


Meanwhile, wash and dry a BIG bunch of spinach... I am going to say I used two packed cups.. But it is really only about 6-8 oz...


When you throw it in it will be super fluffy, but as you stir it and it gets hot it will shrink down. Once everything turns bright green and is wilted it is done. Turn the pan off and let it cool.


Transfer the spinach mixture, white beans (you can use any white bean) garbanzo beans, a splash of olive oil, a splash of lemon juice, some salt and pepper, a handful of fresh basil leaves if you have them, and a splash of chicken broth to the bowl of a food processor. Process until smooth, adding olive oil as necessary to get a smooth consistency.


That's it! You are done! It is SOOOOOO addictive and delicious, and I even found a few other uses for it:

I spread some on a chicken breast and made a tasty sandwich
I boiled and drained some pasta, then tossed the hot pasta in a couple spoonfuls of the dip. Landon loved it, and I was pretty content too!
I spread some on garlic toast
I dipped some homemade tortilla chips in it
I licked the spoon... (very tasty).

I am sure there are many more ideas!

Oh how I've missed you all!

I'm baaaaaaaack! So I haven't really left... but I haven't been posting regular like I would like... Part of this is because of work, part because my husband was gone and I wasn't motivated to cook like I normally do, and part because my husband came home and then I wasn't motivated to post because I wanted to spend time with him!!! So all this adds up to almost 3 weeks of inactivity!!!

For this, my dear friends, I apologize!!

Okay... so let me make it up to you... I am going to post a bunch of the recipes I have been collecting and holding on to RIGHT NOW!...

Enjoy!

Wednesday, May 19, 2010

A Pasta Dish... in the MICROWAVE!!!


Yes, you read correctly! A pasta meal that you can prepare in the microwave!!

Start to finish this will take you barely 20 minutes... And it is SO worth the time!

Also, like most of my recipes, this is one of those completely customizable recipes. I really prefer recipes that are more or less a palette for creativity: everyone has different tastes, diets, food styles, whatever you want to say... It is fantastic to be able to add your personality to a meal!

So anyway, you probably want to know what exactly it is that I have made in the microwave... It is a pasta dish with tomatoes, basil, and lots of other delicious stuff. I cooked some chicken breasts (cut into 3 inch strips, or if you are like me and like to buy the frozen bags of chicken breasts already cut into tenders, use that) in a skillet on top of the stove to go on top of the pasta. I marinated the chicken in wine, italian dressing, and a splash of lemon juice. Then I dumped the chicken and the marinade in the skillet with a few drizzles of olive oil and cooked until nice and goldeny brown and cooked all the way through.

While I was cooking the chicken, I dumped a container of grape tomatoes into a casserole dish that has a cover for it (trust me, you need a cover to keep it from splattering everywhere), and added two baby spoon scoops (ummm maybe 1-2 tsp?) of minced garlic, and microwaved for 4 minutes, stirring halfway through...


(before microwaving)


(after they have popped open)

Once all the tomatoes have "popped" open, you are ready to smoosh them with a mashed potatoes masher, and then add 2-3 cups of uncooked pasta, like rotini, shells, penne, or bowties, 2 cups of chicken broth, and 1 cup of wine.


(I used rotini)

A good rule of thumb is to add the same amount of broth that you added of pasta. I had a weird amount of pasta (since I usually make mine fresh and rarely use dried), so I just measured out my pasta, dumped it in, then measured out the broth to the same amount, and poured it on top. Add freshly ground sea salt and pepper on top, then cover and microwave for 10 minutes. Stir well, then microwave for 5 more minutes.


Stir in 1/4 c grated parmesan cheese (the kind in a can), and 1/4 c shredded parmesan cheese (if you don't have it, just leave it out), and a bunch of chopped basil leaves. Top with chicken, garnish with basil and freshly shredded parmesan and serve.


Okay so I am sure you are thinking "wow this is so simple"... Yes, it is! But you can easily dress it up to go with any meal theme or ingredients that you have...

Some ingredients you could add:
Crisp crumbled bacon
Olives
Capers
Roasted red pepper
Sun dried tomatoes
Artichoke hearts
Leeks (you knew that one was coming!)

I am sure there are many more ideas: surprise me with a few!!!!

Monday, May 17, 2010

Pasta with Butternut Squash Wine Sauce


If you have read my blog at all, you have probably noticed something very important about me:

I LOVE leeks. And I love finding random dishes to include leeks in.. Oh and I love wine... and vegetables...

Ok so basically, since Donovan is gone, I can eat whatever the heck I want that he wouldn't normally be game for, and if it is a bust I don't have to worry about him thinking his wife has "lost her touch"...

But guess what? Leeks + butternut squash + wine + pasta = AMAZING!

So here is what you do...

At least 2 hours before you want to serve dinner, preheat your oven to 350 degrees and scrub down a butternut squash. Then slice it in half long ways and place in a baking dish cut side down and fill the dish with about a half inch of water. Bake for about an hour or until super tender. Let cool and when cool enough to handle scoop out the goop and seeds, and then scoop the flesh out of the shells into a bowl and set aside for later. Below is a picture of what the squash looks like when it is nice and tender.... See that spoon on the left? It didn't take any effort to slide into the squash.. If your squash is still a little crisp or tough (don't know how else to describe it), pop it back in the oven for 15-20 minutes.


Now prep your veggies... I chopped a yellow onion very finely, and halved two leeks and then cut into thin half moon ribbons.

Next melt 1/4 c butter in a large skillet and add the leeks and onion. If you want to add some minced garlic, add it when your leeks and onions are getting tender and translucent to avoid burning.


When your veggies are tender and translucent add a splash or two of wine. Okay then add a couple more splashes... Don't be stingy... I think I used about 1/2 c wine or something...

Okay so let the wine mix in with the veggies and butter. Add the reserved butternut squash and mix into the leek and wine mixture.


Add a couple splashes of heavy cream (about 1/4 c or so) and stir until super creamy. I added a couple good dashes of sage and some fresh ground pepper and sea salt. Cook until heated through.


You can mix this sauce in with some cooked angel hair, fettucine, penne, or any pasta that you like, then top with cheese and bake for 15-20 minutes, or serve on pasta as is.

Landon ate this like it was the only thing he has eaten in days! It was gone in seconds!


I made it just like the above recipe and served it with some pan grilled chicken breast alongside it. I garnished it with a couple fresh basil leaves and some freshly grated parmesan cheese.

This is a very delicious, easy meal for the whole family, and can easily be changed to suit anyone's taste buds...

A couple ideas:

Throw a handful or two of fresh spinach in with the leeks and onions
Roast a bunch of grape tomatoes in the oven while baking your squash: only roast them until they "pop", checking often so they don't burn, and shaking the pan occasionally to ensure evening roasting and that they don't burn and stick to the pan.It should take about 10-15 minutes, but still check often. Then add these to your sauce in the last step for an extra Italian flair...
Chop a roma tomato up and sprinkle on top
Crumble a few crisp pieces of bacon on top
Use the sauce, some ricotta cheese, and some chopped cooked chicken as a filling for manicotti, shells, or lasagna
Top with sun dried tomatoes and kalamata olives for a Mediterranean feel

Get creative! If you think of any great ideas, add them in a comment!!

Friday, May 14, 2010

Oh pooh... I am alone... and a casserole!

So my darling lovely husband (puke now if you will) left today for two weeks..

Two weeks is not that long, but it is long enough for me to go a little crazy missing him...

Okay who am I kidding, two weeks is going to drag out like you wouldn't believe.

I know I went through months and months, but it doesn't make being away from him at all any easier.

But there is a little bit of liberation when he is gone...

I GET TO MAKE WHATEVER I WANT FOR DINNER!!!!

WOO HOO!!!!!

You know what I am going to make with my new found freedom and liberation?!?!!

Leftovers...

Yup. Leftovers.

I made two casseroles tonight for dinner to take to my friends' who just had babies. I used a recipe I found on another blog and tweaked it, and called it "Fiesta Chicken Casserole". In hindsight, I would have tweaked it even more.

Here is a link to the original, below is what I would change.

To make Fiesta Chicken Casserole:

Chop an onion and sauté until tender. Add 2 cups chopped cooked chicken, a drained can of black beans, and a cup of frozen corn. Stir in a can of Rotel, a can of cream of chicken soup, and a can of another cream of (chicken, celery, or mushroom) soup... you choose.

Turn off the heat and mix these things together well. Then stir in some chili powder, garlic powder, and pepper.

Preheat oven to 350 and grease a 13x9 inch casserole dish, or if you are like me and making this to freeze or for a friend, grease two 8x8 foil casseroles. Tear some corn tortillas into quarters and layer the bottom with them. Spread a bit of the mixture on top of the tortillas and top with a good smothering of cheese. I used the "four cheese mexican blend"... But use whatever you have: monterey jack and cheddar would be fabulous! Repeat until all of the chicken mixture is gone and top with plenty of cheese.

Bake at 350 for 30 minutes.

If you want to freeze this casserole, wrap tightly with foil and then freeze. When you want to have it for dinner simply throw in the fridge to thaw the night before, then bake according to the original instructions.

Enjoy! But seriously, read the original recipe for a different take on it (it was her recipe in the fist place) and a good laugh about how much her husband loves this casserole!!!

Thursday, May 13, 2010

Tuna Burger Wraps!!!


For lunch today I found myself digging through the pantry asking "what am I going to make for me and the kid!!!" Explanation: it is the day before grocery day and my house is barren...

So I ended up finding a can and a packet of tuna: about 7.5 oz total... ish... and a bunch of fresh spinach and lettuce.

So I made tuna burgers and wrapped them in lettuce, and made some cheesey creamed spinach which I will post next.

Tuna burgers are WAY better than they sound, and they are a great way to get kids to eat a little fish, as well as a great break from plain old tuna fish sandwiches... another plus: they don't stink like regular tuna fish sandwiches do! I put my tuna burgers on lettuce leafs, more like a lettuce wrap than a burger, but you can serve yours on toasted buns, bread, or just by themselves!

Take a can of tuna (I used 1 5 oz can of tuna and a 2.5 oz pouch of tuna and got 4 small bun sized patties, if you need to feed more people, double the tuna and just adjust the bread crumbs and mayonnaise, but don't add an extra egg) and drain it.

In a small bowl, mix a heaping spoonful of mayonnaise, a good squirt of mustard, and an egg until blended. Then add about 1/3 a cup bread crumbs and your tuna. I think I ended up adding at least 1/4 more bread crumbs. I wanted it to make a good enough mixture to handle and flatten into a patty.

**Added on May 15** I forgot to put that I added a good handful of chopped parsley to the mixture!


Divide mixture into equal servings (eyeball it depending on how many people you are feeding) and flatten into patties. Then coat in more bread crumbs until it is no longer sticky to the touch.

Drizzle a little bit of olive oil in a pan big enough to fit all the patties, then lay each patty in the pan. Spray the tops of the patties with cooking spray (I know that is totally cheater town, but it works so well that I can't help myself!). Cook on med hi heat about 4 minutes on each side, or until each side get nice and goldeny brown.


While they are cooking, tear some big pieces of lettuce and wash and dry them. Cut a red onion and grab your pickles. If desired, keep your mayonnaise and mustard out, though I skipped extra condiments.

Put a patty on a lettuce leaf, top with pickles and onion and any other desired ingredients (avocado and bean sprouts would have been delicious!). Enjoy your ten minute lunch! (Or dinner!)


Healthy kids tip: Some grated celery, zucchini, and/or carrots and add them to your mixture. Don't over do it, but a rib of celery and a small carrot, or a small zucchini should blend in nicely.


I served Landon's to him cut into small "baby burger" pieces each topped with its own pickle!

Wednesday, May 12, 2010

Preparation... And Bread Bowls...

So I start my new job on Monday, and it is going to be a full time position which will have me completely out of my comfort zone and away from my kitchen... This is good, yes, but I will have to work twice as hard to keep our house stocked with all of our favorites that usually take me hours to make. So I decided to get a leg up on some of my baking so that I can freeze portions for future use, and then I won't have quite as much work ahead of me when I come home tired from work!

Today I am going to make bread bowls that I can freeze and then thaw and fill with soup or even dip for a party. I originally had the thought that I would make these to serve with broccoli cheese soup, homemade of course, thanks to Anneka's recipe, but then I decided to just make a bunch to have on hand whenever necessary. If you plan on doing this as well, make sure to under bake them just a little bit, then freeze them on a cookie sheet, then put them all into a freezer bag together and toss in the freezer for when you need them. If you try and put them in the bag all at once before separately freezing, you will have a giant frozen mess, so don't do that. Since they will be under baked, you can pop the frozen bread bowls into a preheated oven to bake the rest of the way, which will help thaw them and finish baking them at the same time: it will be like they were baked fresh the whole time!

To come up with the recipe I read a few different "crusty" bread recipes. This is the one that I fashioned...

If you have a bread machine with a dough cycle, then this will be cake. If not, you will need to mix your yeast with the warm water first, then sift in the remaining ingredients and knead, then let rise.... For those with a bread machine, follow me:

Put the following in your bread machine bowl in this order:

2 cup warm water
5 1/2 c sifted bread flour
2 T sugar
2 teaspoon salt
1 T yeast


Set on the dough cycle and let it go until the cycle is over. Then lightly flour and let rest in a warm area for 10-15 minutes.

Now it is time to form your "bowls". Divide your dough into 6 equal sections.

You can form your bowls 1 of two ways...

1. You can shape your dough into a ball and let it rise for an hour, then cut a criss cross into the top.

2. You can grease glass custard or prep cups (I use my pampered chef prep cups), and form the dough around the upside down cup on a cookie sheet. If you choose to do it this way you will want to make sure that you don't accidentally fold the dough under the cup. Let rise 1 hour before baking.

Before baking, beat together an egg yolk and 1 tablespoon water, then brush onto the surface of each bread bowl. Bake in a 375 degree oven for about 20 minutes.

Be careful when lifting your bread bowls from the cups, if that is the method you choose, then let rise on wired racks. I know I don't have to say this... but the custard cups will be hot, so don't try and grab them and pull them off of the bowl... just please, don't ;) .

Remember, if you want to freeze your bowls, under bake the ones you want to freeze by about 6 minutes, or to the point where they are firm, but not fully cooked.

I hope you enjoy them!

Monday, May 10, 2010

Lemon and Orange Herb Chicken with Carrots and Roasted Asparagus


Saturday night was "Date Night" for me and Donovan. He is leaving on Friday for a 2 week det, so we have been trying to have little "dates" together, even if it means watching a movie on pay per view and having a "picnic" on the floor in our living room. So I decided to make a "fancy" meal, since I knew we wouldn't be getting a real date anytime soon.

I had a whole chicken in the fridge and I knew I wanted to roast it in the oven. I also had a bunch of oranges and lemons to use, so I decided to put it all together.

Preheat your oven to 350.

First I rinsed the chicken off and took out the neck and gizzards and innards and tossed them aside. Normally I wouldn't condone throwing away perfectly good innards, but I knew I wouldn't have time to put them to use, so in the trash they went.

Pat the chicken dry and gently loosen the skin on the chicken. Cut a stick of butter into even slices and stick the butter under the skin. Put chicken, breast side down at first (this helps seal in the juices), into a roasting pan, and cover with 1-2 cups chicken stock or broth, if you don't have stock on hand.

Cut an orange and squeeze the juice all over the chicken, then stuff the orange shell inside the chicken. I threw some baby carrots into the pot with the chicken and dunked them down under the broth so they could get soft. Melt a stick of butter and pour it on top of the chicken.

Salt and pepper your chicken, then sprinkle with rosemary, thyme, sage, and any other herbs you like. Put in the preheated oven for 20 minutes, covered with foil or a lid. Then pull the pot out and flip the chicken over so the breast side is up. Then sprinkle with the same herbs you put on the other side, and a little more salt and pepper.


Slice a lemon or two into 1/4 inch thick slices. Then, using toothpicks, secure the lemon slices to the top of the chicken.


Roast for about 2 more hours, uncovered, or until the thickest part of the thigh reads 170. I cooked ours until the thigh read 180 just to be on the safe side, and it was still super juicy and incredible!!! If you want the skin to get a little crispier, you can remove the lemon slices and put it under the broiler for a minute or two, but don't overdo it! You don't want a dry chicken!!!

Let the chicken rest for ten minutes before serving: this helps the juices settle and keeps all the juices from running right out of the chicken when you make that first slice.


While the chicken is resting, pop your asparagus into the oven and let it roast. I usually just cut off the woody stems of the spears, then drizzle with olive oil and sprinkle with sea salt, pepper, and my homemade lemon pepper seasoning. Then place on a cookie sheet and roast for about 5 minutes on each side in the already preheated oven.

BBQ Pork Sandwiches with Baked Mac n Cheese

Friday night's dinner was half planned and half improvised... I was still on my baby fix and far more concerned with seeing baby Zane than cooking dinner. So I threw a pork roast into the crock pot in the morning, topped it with a bottle of our favorite BBQ sauce (Sweet Baby Ray's or Jack Daniels are the staples in this house), then poured about 1 1/2 - 2 cups Dr. Pepper on top. Then I put on the lid and turned it on low for 8 hours.

You can just use 1 can Dr. Pepper, or Coke, or Pepsi, or whatever. But we had a 2 liter Dr. Pepper, so I just dumped in a whole bunch... about 2 ish cups.

About 30 minutes before dinner was ready I brought some baby shell pasta to a boil on the stove and then drained it. Then I greased a casserole dish and layered pasta, shredded sharp cheddar cheese, cracker crumbs, and a little bit of evaporated milk. I continued until all the pasta was used up: about 3 layers. Then I baked at 350 degrees for 20 minutes, or until the cheese on top is super bubbly.

Shred your pork in the crock pot and lift with a slotted spoon onto toasted buns (spray with pam and broil for 2-3 minutes, cut side up, on a cookie sheet) and top with more BBQ sauce, and then the bun. Serve with baked Mac n Cheese and a salad.

Super yum!

Friday, May 7, 2010

Brisket and a Baby!!!

Yesterday was such an exciting day for my family and pretty much anyone who knows us well, because most people who know us know our good friend Gypsy, which means that they know that Gypsy had her baby last night!!!!

YAY!!!!!

Well I had started dinner in the crock pot in the morning-ish, around the time that I heard that Gypsy was back in the hospital, but that they thought she was really in labor this time (yay!). So I figured a crock pot meal was definitely the best choice, that way if I had to scoot during dinner I wouldn't need to worry about it burning.

I salt and pepppered a 2-3 lb brisket, then browned it in a hot skillet with about 1/4 c olive oil. I made sure to cut off all the extra fat first, that way the meat gets all nice and browned and seals in those delicious juices.


Then I transfered the brisket to the crock pot and added a little more olive oil to the pan, along with a sliced onion and some garlic. I let the onion get nice and soft and then added some seasonings: thyme, bay leaves, a little bit of seasoned salt. Then I dumped some espresso that I brewed specifically for this, so it was nice and fresh. I don't know how much I used, Rachael Ray used like 3/4 c espresso and 1 cup water or something, but I did about 1-1/4 c espresso and about 1/2 c or so water. Add a little dash of soy sauce and some Worcestershire (trust me, sounds weird, but trust me... oh and no more than 1-2 T of each). Let the onions soak up the espresso and get soft, then dump everything on top of the brisket. Scoop the onions back on top of the brisket, cover, and cook on low for 8ish hours.


It was super delicious.

We had basil and garlicky green beans, and mashed sweet potatoes.


And about halfway through fixing the sides, I get a text telling me to head to the hospital because it would be a good time for me to go. Now, this is about 7:15 when I get this call... By the time I finished up dinner, changed and bathed the baby and laid him down, grabbed my bag and headed out the door, it was about 8:35... So I pull into the parking lot a few minutes later and try to call, to no avail...

I walk upstairs into the maternity wing and what do I hear: a sweet, newborn baby cry. I looked at a nurse and asked if that was Gypsy's baby, and she smiled the biggest smile and said that he was born barely a MINUTE before I walked off the elevator!

I immediately started getting all weepy and smiley and jumpy and went and sat in the waiting room like the dad's used to in the olden days... (Isn't this silly: I am not even blood related and I am falling all over myself!!!!) They called me in to see the mama and baby and I couldn't believe how gorgeous she looked, or how healthy the baby looked! He has the most gorgeous color and chubby cheeks, red hair like his big brother, and the cutest little nose you could ever see! He has the grip of a gladiator and the appetite of a teenage boy!!!! Gypsy and Josh are truly blessed with their bundle of joy!!!